Angularには、大きく分けて3タイプのディレクティブがあります。
- コンポーネント (Components)
- 構造ディレクティブ (Structural directives)
- 属性ディレクティブ (Attribute directives)
構造ディレクティブは、DOM要素を追加、削除してDOMレイアウトを変更するディレクティブで、*ngForや*ngIfに代表される*記法を用いたディレクティブの事を指します。
この記事ではまず*ngIfの中身を簡単に解説した後に、構造ディレクティブを自作する方法を解説します。
ロジックに基づきDOMを出し分けするようなケースでは、構造ディレクティブを活用することで、シンプルに記述することが出来るようになります。
目次
*ngIfの解説
*ngIfと完全に同様の挙動を示すカスタムディレクティブ*myNgIfディレクティブを作成してみます。
実装は下記の様になります。
import { Directive, Input, TemplateRef, ViewContainerRef } from '@angular/core';

@Directive({
  selector: '[myNgIf]'
})
export class MyNgIf
{
  public constructor(
    private templateRef: TemplateRef<any>,
    private viewContainer: ViewContainerRef)
  {
  }

  @Input() set myNgIf(condition: boolean)
  {
    if (condition) {
      this.viewContainer.createEmbeddedView(this.templateRef);
    } else {
      this.viewContainer.clear();
    }
  }
}
上記で作成したコンポーネントは@NgModuleにて定義されているdeclarations配列にMyNgIfを追加する事で利用可能になります。
実際に利用する際は下記のシンタックスとなります。
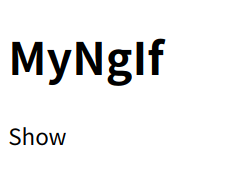
<h1>MyNgIf</h1>
<div *myNgIf="true">Show</div>
<div *myNgIf="false">Hide</div>
上記コードをレンダリングすると、画面上にはShowが表示されます。
実用的な構造ディレクティブを自作する
基本的には前項にて解説した手順を踏襲し、適宜必要な箇所をカスタマイズすれば構造ディレクティブは作成可能です。
しかし上記例ではパラメーターに応じてDOMをレンダリングするか破棄するか、のいずれかのみしか表現出来ないため、ここからは一歩踏み込み、一定の状況を設定した上で構造ディレクティブを実装してみます。
例えばログインが必要なアプリケーションを想定して、ユーザーが権限を保有している場合は通常通りDOMをレンダリング、権限を保有していない場合は別のコンポーネントをレンダリングする、という動作を行う構造ディレクティブを作成します。
下記のようなシンタックスにて利用するのがゴールです。
<h1>Menu</h1>
<div *restrict="'func1'">機能1</div>
<div *restrict="'func2'">機能2</div>
<div *restrict="'func3'">機能3</div>
*restrictディレクティブは渡された権限名をユーザーが保持していれば通常通りレンダリング、保持していない場合はその旨を伝えるコンポーネントをレンダリングします。
まず先に権限を保持していなかった場合にレンダリングされるコンポーネントを作成します。
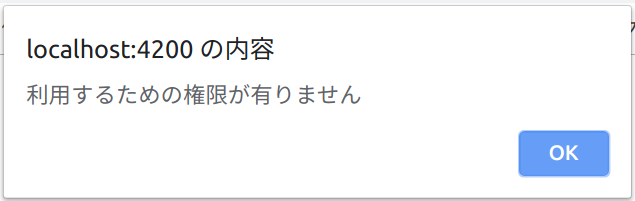
ここでは、画面上に「利用出来ません」という文字を表示し、コンポーネントをクリックすると「利用するための権限が有りません」とアラート表示されるコンポーネントを作成します。
import { Component } from '@angular/core';

@Component({
  selector: 'restricted',
  template: `<div (click)="showMessage($event)">利用できません</div>`
})
export class RestrictedComponent
{
  public showMessage(event: Event): void
  {
    alert('利用するための権限が有りません');
  }
}
ここで定義したRestrictedComponentは、コンポーネントをプログラムから動的に作成する方法にて利用するため、@NgModuleのdeclarationsだけでなくentryComponentsにも定義する必要があります。
例)
@NgModule({
  declarations: [
    AppComponent,
    RestrictedComponent // <- 定義
  ],
  entryComponents: [
    RestrictedComponent // <- ここにも定義が必要
  ],
  imports:      [
    BrowserModule,
    AppRoutingModule
  ],
  providers:    [],
  bootstrap:    [AppComponent]
})
export class AppModule
{
}
次にメインとなる*restrictディレクティブを定義します。
import { ComponentFactoryResolver, Directive, Input, TemplateRef, ViewContainerRef } from '@angular/core';
import { RestrictedComponent }                                                       from './restrected.component';

@Directive({
  selector: '[restrict]'
})
export class RestrictDirective
{
  public constructor(
    private templateRef: TemplateRef<any>,
    private viewContainer: ViewContainerRef,
    private ComponentFactoryResolver: ComponentFactoryResolver,
  )
  {
  }

  @Input() set restrict(permissionKey: string)
  {
    if (this.check(permissionKey)) {
      // 権限を保持していた場合、通常通りDOMをレンダリング
      this.viewContainer.createEmbeddedView(this.templateRef);
    } else {
      // 権限を保持していないため、RestrictedComponentをレンダリング
      const factory = this.ComponentFactoryResolver.resolveComponentFactory(RestrictedComponent);
      this.viewContainer.createComponent(factory);
    }
  }

  private check(key: string): boolean
  {
    // ここでは例として保有している権限を静的に定義、実際はサーバー等から権限情報を取得するようにする
    const permissions = ['func1', 'func2', 'func3'];

    return permissions.includes(key);
  }
}
作成した*restrictディレクティブを最初に例示したHTMLにて利用してみます。
<h1>Menu</h1>
<div *restrict="'func1'">機能1</div>
<div *restrict="'func2'">機能2</div>
<div *restrict="'func3'">機能3</div>
上記HTMLをレンダリングすると下記の様に表示されます。
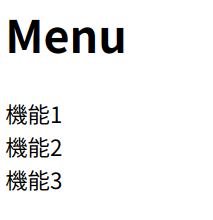
現時点ではすべての権限を保持しているため、全ての機能が通常通りレンダリングされています。
試しに*restrictディレクティブのcheck()内の権限を削ってみます。
const permissions = ['func1', 'func3']; // 'func2'を配列から削除

return permissions.includes(key);
すると削除された機能に該当するDOMが正常にRestrictedComponentへ置き換わっていることが確認出来ます。
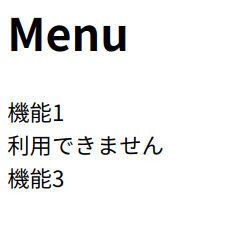
DOMをクリックすることでアラートが表示されました。
権限の判定、動的なDOMの切り替え、をディレクティブが全て担ってくれるため、DOMの構造を非常にシンプルに保ったままリッチなUIを実装することが可能となります。
更に発展
通常コンポーネントは@Inputや@Outputといったデコレーターを通じて、パラメーターの受け渡しが可能です。
前項で実装した*restrictディレクティブにおいても、RestrictedComponentを生成する際に@Inputを用いてパラメーターを受け渡せると非常に便利なのですが、createComponent()を利用したコンポーネントの生成では、残念ながら@Inputや@Outputを指定することが出来ません。
そのため少々トリッキーではありますが、下記のように実装することでパラメーターの受け渡しを実現させます。
RestrictedComponent
import { Component } from '@angular/core';

@Component({
  selector: 'restricted',
  template: `<div (click)="showMessage($event)">{{notice}}</div>`
})
export class RestrictedComponent
{
  public notice: string       = '';
  public alertMessage: string = '';

  public init(notice: string, alertMessage: string): void
  {
    this.notice       = notice;
    this.alertMessage = alertMessage;
  }

  public showMessage(event: Event): void
  {
    alert(this.alertMessage);
  }
}
RestrictDirective
import { ComponentFactoryResolver, Directive, Input, TemplateRef, ViewContainerRef } from '@angular/core';
import { RestrictedComponent }                                                       from './restricted.component';

export interface RestrictOptions
{
  key: string;
  notice?: string;
  alertMessage?: string;
}

@Directive({
  selector: '[restrict]'
})
export class RestrictDirective
{
  public constructor(
    private templateRef: TemplateRef<any>,
    private viewContainer: ViewContainerRef,
    private ComponentFactoryResolver: ComponentFactoryResolver,
  )
  {
  }

  // 上部で定義している`RestrictOptions`を受け取るように変更
  @Input() set restrict(options: RestrictOptions)
  {
    if (this.check(options.key)) {
      this.viewContainer.createEmbeddedView(this.templateRef);
    } else {
      const factory      = this.ComponentFactoryResolver.resolveComponentFactory(RestrictedComponent);
      const componentRef = this.viewContainer.createComponent(factory);

      // componentRefより作成された`RestrictedComponent`を参照、渡したいオプションと共に独自で定義した`init()`を呼び出す
      componentRef.instance.init(options.notice, options.alertMessage);
    }
  }

  private check(key: string): boolean
  {
    // 例として全ての権限を剥奪
    const permissions = [];

    return permissions.includes(key);
  }
}
カスタマイズが完了した*restrictディレクティブは下記のように使用します。
<h1>Menu</h1>
<div *restrict="{key: 'func1', notice: '機能1は利用出来ません。', alertMessage: '機能1を利用する権限がありません。'}">機能1</div>
<div *restrict="{key: 'func2', notice: '機能2は利用出来ません。', alertMessage: '機能2を利用する権限がありません。'}">機能2</div>
<div *restrict="{key: 'func3', notice: '機能3は利用出来ません。', alertMessage: '機能3を利用する権限がありません。'}">機能3</div>
レンダリング結果は下記の様になります。
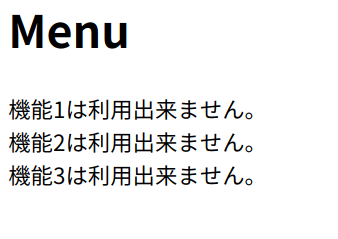
*restrictディレクティブを通じてRestrictedComponentへパラメーターを伝搬させる事が出来ました。
これにより表現の幅が更に広がり、複雑なDOM操作が要求される場面においてもをコードを非常にシンプルに保つことが可能です。